Difference between revisions of "Apertium VirtualBox"
(Updated to Xubuntu 14.04) |
|||
| Line 3: | Line 3: | ||
Since so many have problems getting Apertium to run on Windows or OS X, or are limited in bandwidth, [[User:Tino_Didriksen|Tino Didriksen]] has put together a ready-to-use VirtualBox VDI: |
Since so many have problems getting Apertium to run on Windows or OS X, or are limited in bandwidth, [[User:Tino_Didriksen|Tino Didriksen]] has put together a ready-to-use VirtualBox VDI: |
||
| − | * http://tinodidriksen.com/uploads/Apertium-VirtualBox- |
+ | * http://tinodidriksen.com/uploads/Apertium-VirtualBox-20140418.7z |
| − | * |
+ | * 617277916 bytes (589 MB - smaller than an Ubuntu ISO !) |
| + | * SHA-1: 30565fa2e73648a24ac4b4b0ff7e97d5c44b7fa0 |
||
| − | * SHA-1: 3017e3530cf3f7827a54fed8f35c2892aa922b2d |
||
...or if you prefer a ZIP file: |
...or if you prefer a ZIP file: |
||
| − | * http://tinodidriksen.com/uploads/Apertium-VirtualBox- |
+ | * http://tinodidriksen.com/uploads/Apertium-VirtualBox-20140418.zip |
| − | * |
+ | * 975284287 bytes (931 MB) |
| + | * SHA-1: eda5bf5e29efb2873b3d6e6b551fc04e14a3d2f1 |
||
| − | * SHA-1: 73bd362069f7a5d4add71f0eb5ccf302b6a97ad7 |
||
| − | The archive decompresses to a 4. |
+ | The archive decompresses to a 4.28 GB vdi file. |
==Contents== |
==Contents== |
||
| − | * Xubuntu |
+ | * Xubuntu 14.04, so Xfce4 instead of Unity (Ubuntu's fancy-yet-useless interface), trimmed of all non-essential packages |
| − | * VirtualBox 4.3. |
+ | * VirtualBox 4.3.10 Guest Additions |
* XChat, set to automatically connect to Freenode #apertium as nick ap-vbox (appending -2 or -3 on conflict), preconfigured in UTF-8 mode |
* XChat, set to automatically connect to Freenode #apertium as nick ap-vbox (appending -2 or -3 on conflict), preconfigured in UTF-8 mode |
||
* Firefox, homepage set to Apertium Wiki |
* Firefox, homepage set to Apertium Wiki |
||
| Line 32: | Line 32: | ||
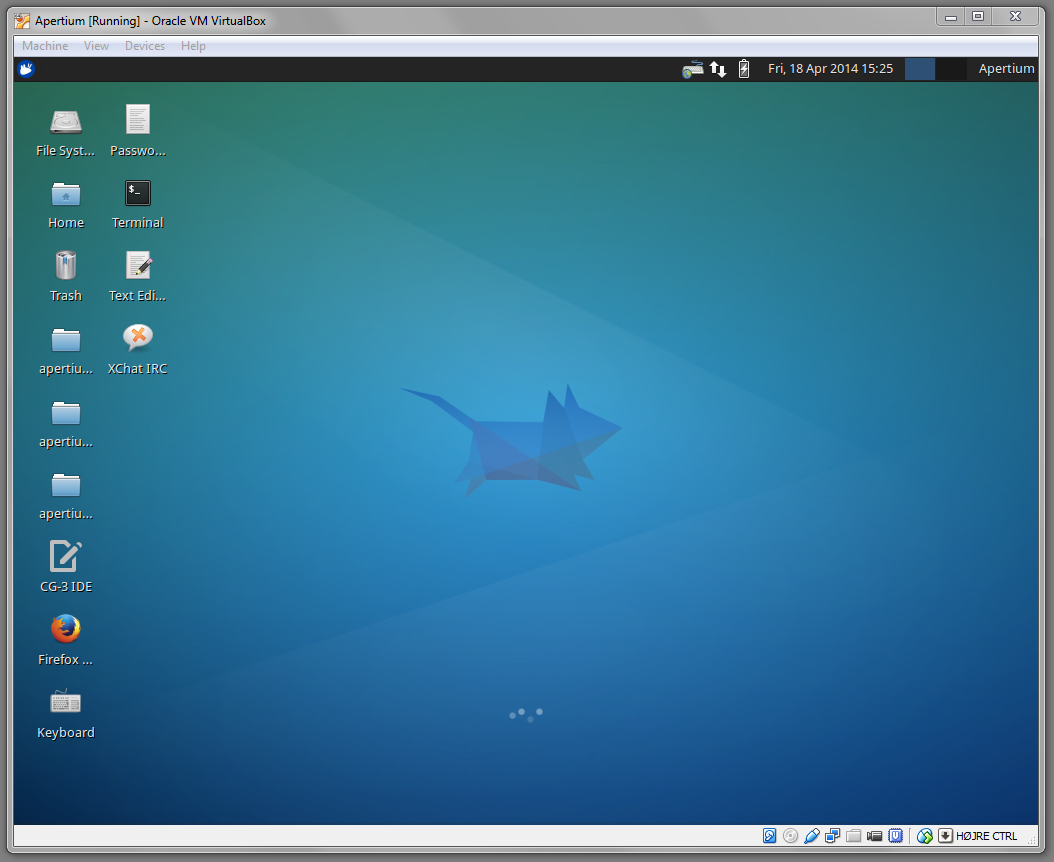
On first boot, it looks like: |
On first boot, it looks like: |
||
| − | http://tinodidriksen.com/uploads/Apertium-VirtualBox- |
+ | http://tinodidriksen.com/uploads/Apertium-VirtualBox-20140418.png |
On the desktop is apertium-kaz-tat which works - compiling and testing that language pair should pretty much guarantee all required tools are installed and functional. |
On the desktop is apertium-kaz-tat which works - compiling and testing that language pair should pretty much guarantee all required tools are installed and functional. |
||
| Line 51: | Line 51: | ||
==Step-by-Step Installation Instructions== |
==Step-by-Step Installation Instructions== |
||
| − | 1. Download the file (http://tinodidriksen.com/uploads/Apertium-VirtualBox- |
+ | 1. Download the file (http://tinodidriksen.com/uploads/Apertium-VirtualBox-20140418.7z). |
| − | 2. Use 7-Zip or a similar program to unzip the file. There should be exactly one thing in the unzipped folder - the Virtual Disk Image (VDI) entitled Apertium (Xubuntu |
+ | 2. Use 7-Zip or a similar program to unzip the file. There should be exactly one thing in the unzipped folder - the Virtual Disk Image (VDI) entitled Apertium (Xubuntu 14.04). |
3. Start VirtualBox and click "New" to create a new virtual machine. |
3. Start VirtualBox and click "New" to create a new virtual machine. |
||
| Line 61: | Line 61: | ||
5. For Memory, give it at least 512 MB RAM - it might run with less, but the more the better. |
5. For Memory, give it at least 512 MB RAM - it might run with less, but the more the better. |
||
| − | 6. For Hard Disk, select the "Use an existing virtual hard drive file" radio button. Pick Apertium (Xubuntu |
+ | 6. For Hard Disk, select the "Use an existing virtual hard drive file" radio button. Pick Apertium (Xubuntu 14.04).vdi from the drop-down menu, or if it isn't there, click the folder icon with the green arrow to the right and navigate to wherever you unzipped the file to. Finish the process by clicking "Create". |
| − | 7. You can now run the new virtual box. On first boot it should look like this: http://tinodidriksen.com/uploads/Apertium-VirtualBox- |
+ | 7. You can now run the new virtual box. On first boot it should look like this: http://tinodidriksen.com/uploads/Apertium-VirtualBox-20140418.png |
==Clipboard== |
==Clipboard== |
||
Revision as of 15:38, 18 April 2014

Since so many have problems getting Apertium to run on Windows or OS X, or are limited in bandwidth, Tino Didriksen has put together a ready-to-use VirtualBox VDI:
- http://tinodidriksen.com/uploads/Apertium-VirtualBox-20140418.7z
- 617277916 bytes (589 MB - smaller than an Ubuntu ISO !)
- SHA-1: 30565fa2e73648a24ac4b4b0ff7e97d5c44b7fa0
...or if you prefer a ZIP file:
- http://tinodidriksen.com/uploads/Apertium-VirtualBox-20140418.zip
- 975284287 bytes (931 MB)
- SHA-1: eda5bf5e29efb2873b3d6e6b551fc04e14a3d2f1
The archive decompresses to a 4.28 GB vdi file.
Contents
- Xubuntu 14.04, so Xfce4 instead of Unity (Ubuntu's fancy-yet-useless interface), trimmed of all non-essential packages
- VirtualBox 4.3.10 Guest Additions
- XChat, set to automatically connect to Freenode #apertium as nick ap-vbox (appending -2 or -3 on conflict), preconfigured in UTF-8 mode
- Firefox, homepage set to Apertium Wiki
- Gedit
- Foma 0.17
- HFST 3.5.0
- CG-3
- Apertium
- lttoolbox
- apertium-lex-tools
It automatically logs in to a 1024x768 desktop. All passwords set to 'apertium' for when root is needed. Keyboard and timezone are set to Danish, but there is a shortcut for Keyboard configuration on the desktop.
On first boot, it looks like:
http://tinodidriksen.com/uploads/Apertium-VirtualBox-20140418.png
On the desktop is apertium-kaz-tat which works - compiling and testing that language pair should pretty much guarantee all required tools are installed and functional.
Nothing else from svn is left checked out - all was wiped after installing in order to save space.
The image is set up as a dynamically expanding hdd with max size 64 GB, where 8 GB is allocated to swap space.
Prerequisites
- VirtualBox from http://virtualbox.org/
- If you downloaded the 7z archive: 7-Zip from http://7-zip.org/ or something else that can decompress 7z files
- Mac OS X: http://kekaosx.com/
- Ubuntu/Debian/Mint:
sudo apt-get install p7zip - CentOS/RHEL/Fedora:
sudo yum install p7zip - Other: http://google.com/search?q=p7zip
Step-by-Step Installation Instructions
1. Download the file (http://tinodidriksen.com/uploads/Apertium-VirtualBox-20140418.7z).
2. Use 7-Zip or a similar program to unzip the file. There should be exactly one thing in the unzipped folder - the Virtual Disk Image (VDI) entitled Apertium (Xubuntu 14.04).
3. Start VirtualBox and click "New" to create a new virtual machine.
4. For the OS Type, select Linux, Ubuntu.
5. For Memory, give it at least 512 MB RAM - it might run with less, but the more the better.
6. For Hard Disk, select the "Use an existing virtual hard drive file" radio button. Pick Apertium (Xubuntu 14.04).vdi from the drop-down menu, or if it isn't there, click the folder icon with the green arrow to the right and navigate to wherever you unzipped the file to. Finish the process by clicking "Create".
7. You can now run the new virtual box. On first boot it should look like this: http://tinodidriksen.com/uploads/Apertium-VirtualBox-20140418.png
Clipboard
To get the clipboard working between the virtualbox and e.g. Windows, go into Options of that VBox -> General -> Advanced tab -> Clipboard -> Bidirectional.